For a few years our software has been deployed to Google Cloud’s AppEngine Flex environment, which behind the scenes creates a Docker image, pushes it to the GCP Container Registry and then deploys it to a compute engine instance managed by App Engine.
The time had come to take control of the Docker build to increase the flexibility of the deployment options. In GCP there are four Compute options where we can deploy a docker image:
- App Engine Flex
- Compute Engine
- Cloud Run
- Kubernetes (GKE)
Each option has its own trade-offs in features and pricing, so us and our customers could choose what best suits their requirements, and even change the service deployed to over time. Another Kubernetes based option would be to deploy to Anthos.
How to create an optimal production Docker image required some research to remember what the key considerations are when building an image, which include:
- Security - A slimmer base image, minimal extra files and running the app as a non-root user reduces the surface attack area.
- Size - A smaller image means less time when starting a new container. However sometimes extra steps are required in the build process to ensure the final image is the smallest possible
- Speed - The ordering of operations in the Dockerfile is crucial to allow the optimal caching of layers that contribute to an image to reduce build time.
Getting started
The final code for this example can be found here.
Our test app will be a basic NestJS starter app, which we can create by running:
$ npm i -g @nestjs/cli
$ nest new api-server
We’ll start with a simple naive approach, and work our way through to the final optimised to explain the steps.
The goal will be to run the build in a GitLab CI pipeline, so the node_modules folder won’t exist when the repository is checked out in the build. For now we will run it locally to explain some concepts as we update the Dockerfile.
Let’s create the naive Dockerfile in /api-server
FROM node:12
COPY /package.json ./yarn.lock ./
COPY /src ./src
RUN yarn install
RUN npm run build
CMD ["node", "dist/main.js"]
Now run docker build -t test/api-server .
You’ll notice the first line of the output is Sending build context to Docker daemon 219.8MB
The docker client sends all the files in the context to the docker daemon. As we ran docker command with the final . arg (i.e. the current directory) then the context will be all the files in the current directory.
We can exclude files that we don’t need to send by defining a .dockerignore file, which has the same format as a .gitignore file.
We can simulate being on a build server that has checked out the code by ignoring the node_modules we have already installed by creating a file named .dockerignore with the contents:
node_modules
When we run the docker build command again the output is now
Sending build context to Docker daemon 835.1kB
Finally note that the COPY /package.json ./yarn.lock ./ command copies the files from the docker context to the image, not from the file system the docker cli was executed from. If you ever get an error of missing a file to copy make sure you haven’t excluded it from the context in the .dockerignore file.
Building from GitLab CI
Now we’ve tested built the image locally the next step is to build it with GitLab CI and push the image to the GCP Container Registry. Create a gitlab-ci.yaml file with the contents:
image: node:12

variables:
  GCP_PROJECT_ID: 'gcp-nodejs-docker'
  APP_NAME: 'api-server'

stages:
  - build-test
  - build-docker-image

build-test:
  stage: build-test
  script:
    - cd ./api-server
    - yarn install --silent
    - npm run build
    - npm run test
  artifacts:
    paths:
      - api-server/node_modules/
      - api-server/build/

build-docker-image:
  image: docker:19.03.1
  stage: build-docker-image
  services:
    - docker:19.03.1-dind
  script:
    - cd api-server
    # Login using a service account created for the CI build. Define SERVICE_ACCOUNT_KEY as a file variable in the CI settings
    - docker login -u _json_key --password-stdin https://gcr.io < $SERVICE_ACCOUNT_KEY
    - docker build -t gcr.io/$GCP_PROJECT_ID/$APP_NAME:$CI_COMMIT_SHA .
    - docker push gcr.io/$GCP_PROJECT_ID/$APP_NAME:$CI_COMMIT_SHA
Before you commit and push this you will need to:
- Create a service account named gitlab-ci and grant it the Storage Admin role so it can push to the Container Registry, and Cloud Run Admin so it can deploy to Run
- Download a key for the service account and copy the contents to a GitLab CI file variable named $SERVICE_ACCOUNT_KEY
- Enable Google Container Registry API for the project
This build pipeline gives us a baseline of a simple implementation, which took 6min 14seconds 445.5 MB
Weighing in at almost half a gigabyte means more time building, uploading and downloading the image. Let’s see how small we can get it…
Optimising the image
The default node image contains all the tools one might need in development which adds significantly to the image size.
Some lightweight options include the slim or alpine versions of the node image and Minimial Ubuntu which have the own differences i.e. pros and cons. Google has a lightweight distroless image we can use as our base image.
Lets update our Dockerfile to start with
FROM gcr.io/distroless/nodejs
Attempting to build this will result in the error, first as Yarn isn’t installed, and second there isn’t even a shell to run Yarn from.
Normally we would fix this issue by creating a multi-stage build. As the CI build runner is already a version controller script running in a docker container, we will do the required preparation in the CI build script.
In our gitlab-ci.yaml file update the build-test stage to be the following:
build-test:
  stage: build-test
  script:
    - cd ./api-server
    - yarn install --frozen-lockfile
    - npm run build
    - npm run test
    - rm -rf node_modules
    - yarn install --frozen-lockfile --production
    artifacts:
      paths:
        - api-server/node_modules/
        - api-server/build/
If we were using npm instead of yarn the equivalent script would be
script:
  - cd ./api-server
  - npm ci
  - npm run build
  - npm run test
  - npm prune --production
By declaring the node_modules and build artifact paths they will be available in the next build stage where we don’t have the node tools available to create them, as the build-docker-image stage container is created from the ‘docker:19.03.1’ image.
If we wanted to run the Docker build locally we will need to include the node_module dir in the docker context. So remove the node_modules exclusion from the .dockerignore file. A common way to build a .dockerignore is to specify all the extra files we want to ignore, like tsconfig.json, src/ etc, or we can ignore everything by default and then specify what we want to include. .dockerignore
# Ignore everything
**

# Then use overrides to specify what we include
!/package.json
!/yarn.lock
!/build/**
!/node_modules/**
Finally update our Dockerfile to
FROM gcr.io/distroless/nodejs
COPY /package.json ./yarn.lock ./
COPY /node_modules ./node_modules
COPY /dist ./dist
CMD ["node", "dist/main.js"]
Optimise for caching the build layers
In our initial Docker file the line COPY /node_modules ./node_modules is the equivalent replacement for RUN yarn install, and COPY /dist ./dist the equivalent for COPY /src ./src.
The ordering of the operations has been changed to optimise the caching of the layers. The changes to the file system from each command are stored separately in layers and cached.
If a layer changes then it invalidates the cache of any layers after it.
The rule of thumb is to copy the files that change the least often first.
During the course of development the src/dist files would change more often than the package.json/node_modules, so we copy the dist folder last. You can find numerous articles online going into more details of the layers and caching if you wish the research this topic further.
Testing the production image
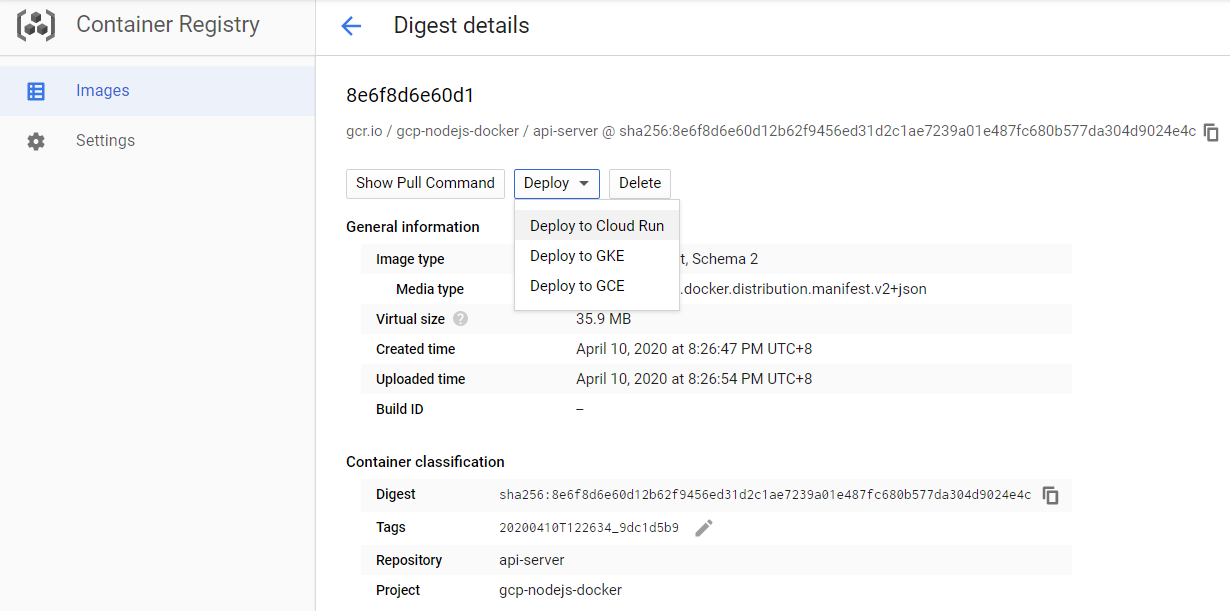
With the CI build succeeding and pushing our image to GCP Container Registry now we need to test if we actually built our image correctly. To quickly test it two options are:
- Build the docker image locally and run it with the docker CLI
- From Container Registry deploy the image to Cloud Run
When this image is deployed it failed with the error Error: Cannot find module '/node' at Function.Module._resolveFilename ...
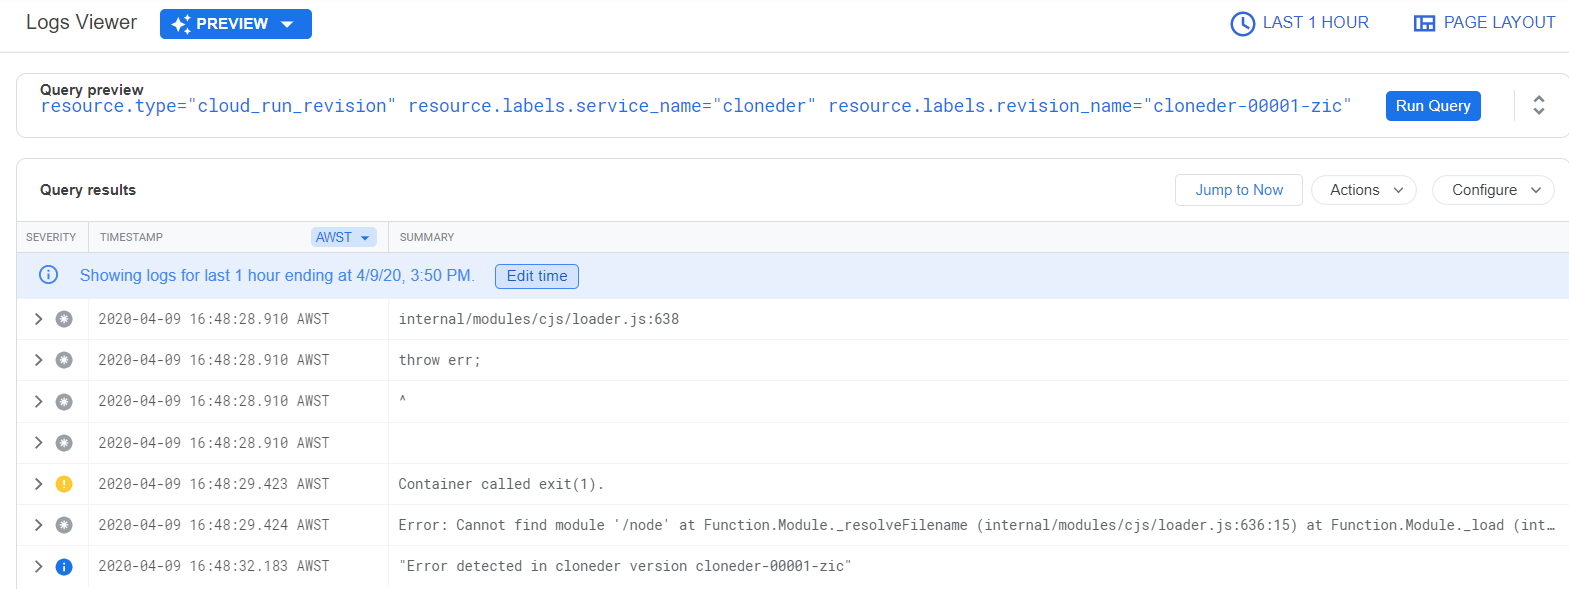
The distroless Node image is configured differently to other images like the base node image or the launcher.gcr.io/google/nodejs image, in that the CMD arguments will be passed directly to the node executable, instead of a shell.
So we need to update the final line of the Dockerfile to CMD ["dist/main.js"]
If we redeploy again to Cloud Run we can see how long it takes for the new version to be deployed in the logs
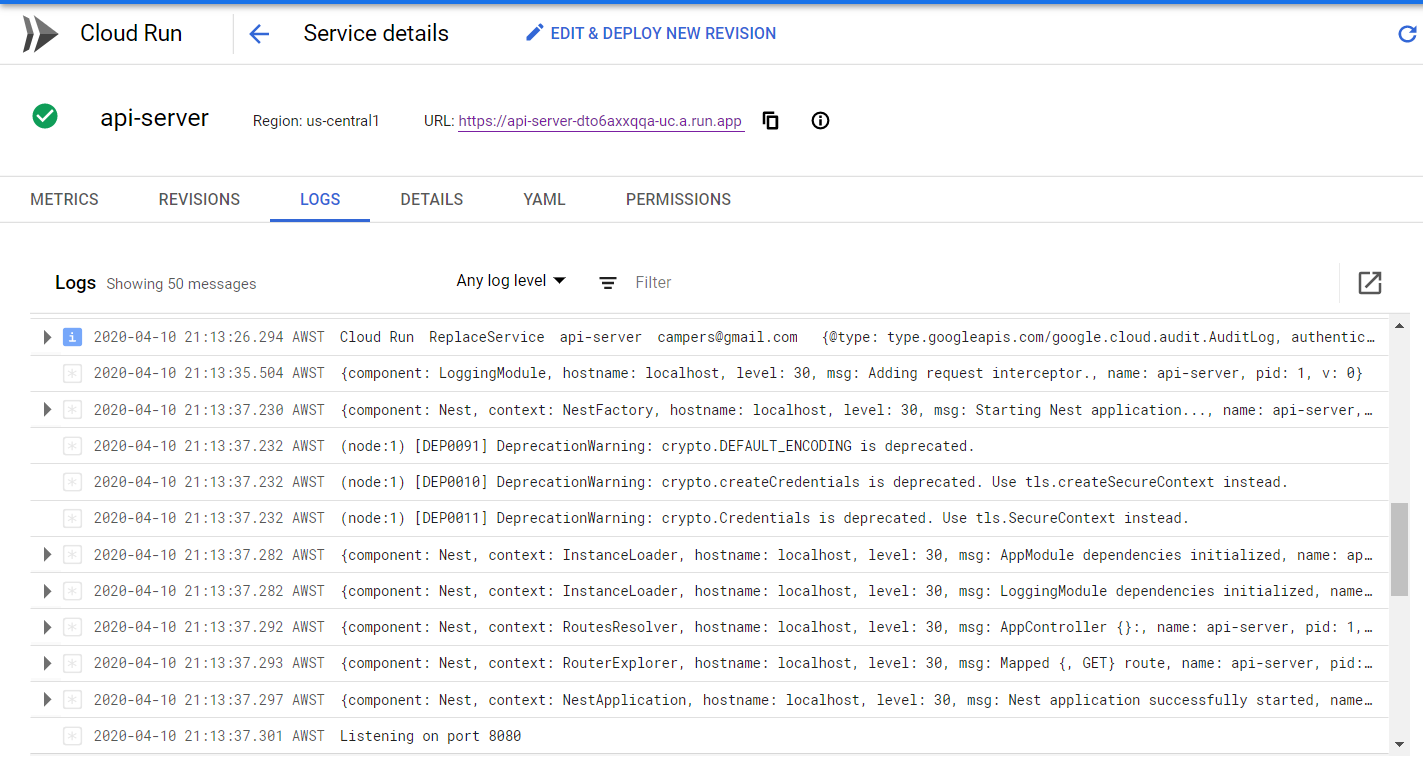
From the ‘Cloud Run ReplaceService’ log message to the ‘Listening on port 8080’ message is 11 seconds.
Keeping our image size down means lets bytes to pull over the network, a smaller docker container to initialise, which increases the responsiveness of a cluster to serve requests when it needs to auto-scale up or replace a crashed node.
Instead of manually deploying to Cloud Run let have our CI build do the deployment. Add the deploy-run stage and RUN_REGION variable as per the following changes to gitlab-ci.yaml:
variables:
  GCP_PROJECT_ID: 'gcp-nodejs-docker'
  APP_NAME: 'api-server'
  RUN_REGION: 'us-central1'

stages:
  - build-test
  - build-docker-image
  - deploy-run

...

deploy-run:
  image: google/cloud-sdk:latest
  stage: deploy-run
  script:
    - gcloud auth activate-service-account --key-file=$SERVICE_ACCOUNT_KEY
    # Use APP_NAME as the Run SERVICE_NAME
    - gcloud run deploy $APP_NAME --project=$GCP_PROJECT_ID --image gcr.io/$GCP_PROJECT_ID/$APP_NAME:$CI_COMMIT_SHA --platform managed --allow-unauthenticated --region=us-central1
  when: manual
--platform-managed means the Run service will be deployed on a Google managed cluster, with the alternative to deploy on your own Anthos service. --allow-unauthenticated allows the service to be publicly accessible without authentication.
After manually running the stage we find this error:
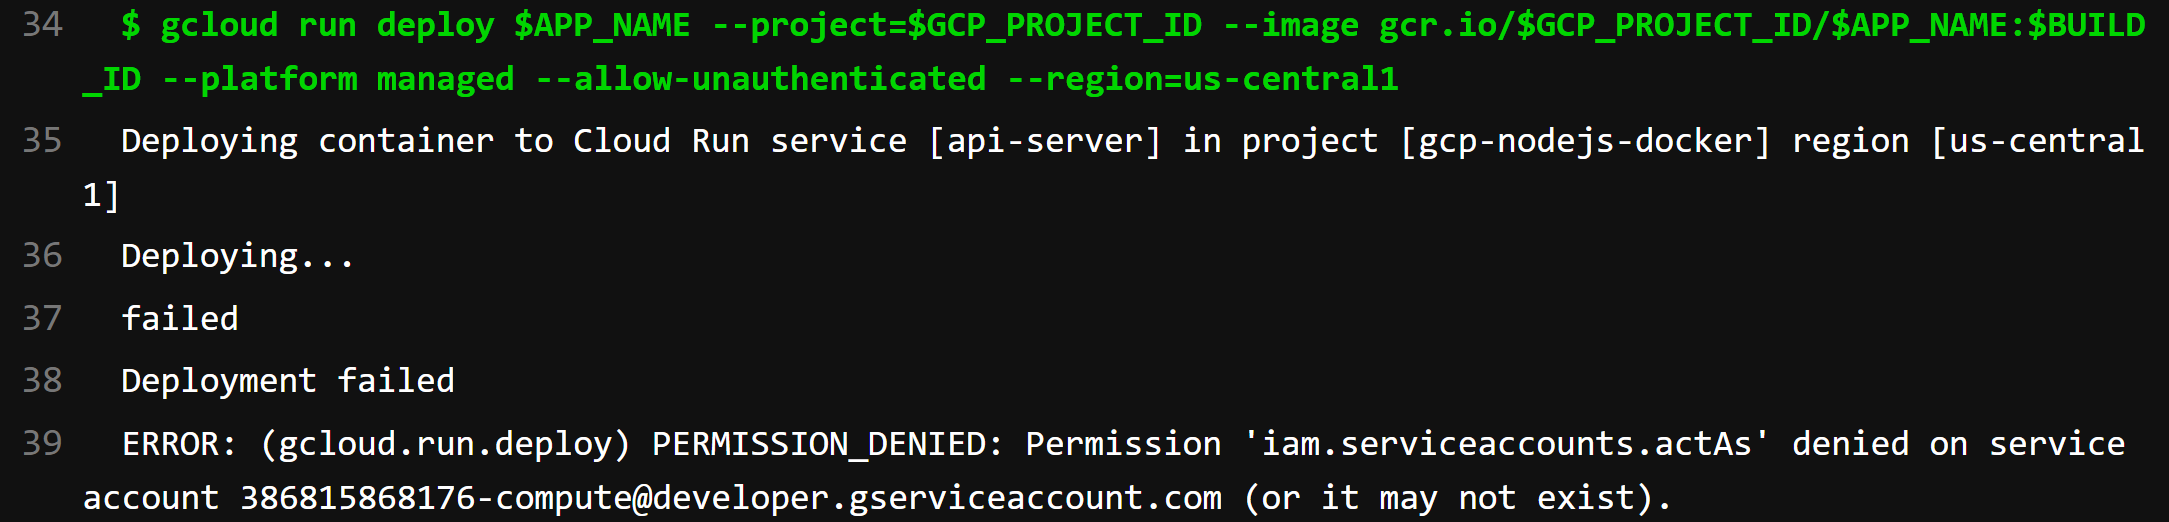
Consulting the Cloud Run documentation we need to grant the Service Account User role to the Cloud Run service account.
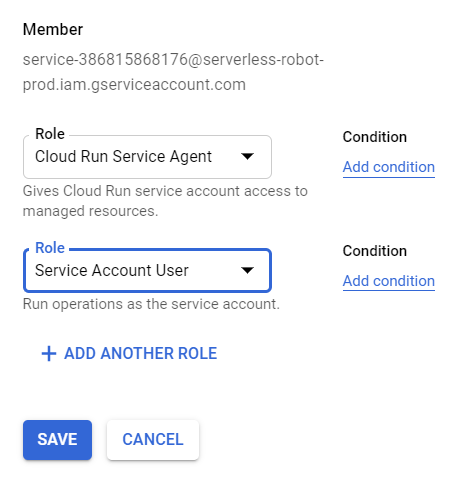
or by the command line
gcloud iam service-accounts add-iam-policy-binding \
  [PROJECT_NUMBER]-compute@developer.gserviceaccount.com \
  --member="[SERVICE_ACCOUNT]" --role="roles/iam.serviceAccountUser"
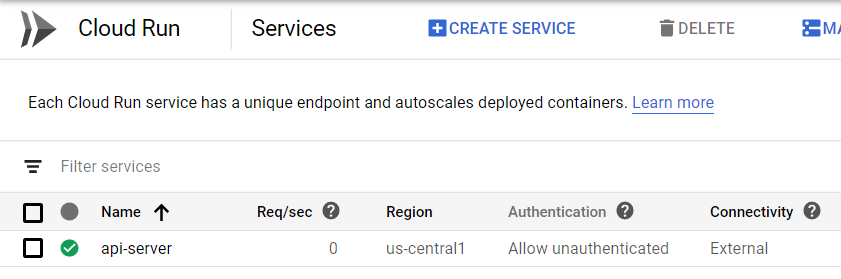
You can simply re-run the failed deploy-run stage in GitLab CI and then should see your Run service deployed with the URL to access and test the service.

Deploying to App Engine
Before you deploy the docker image to AppEngine you will need to:
- Enable the App Engine Admin API and App Engine Flex API.
- To your CI service account add the App Engine Admin and Cloud Build Editor roles.
- Initialise the App Engine service.
The new stage to add to the gitlab-ci.yaml file is:
stages:
  - build-test
  - build-docker-image
  - deploy-run
  - deploy-appengine

...

deploy-appengine:
  image: google/cloud-sdk:latest
  stage: deploy-appengine
  script:
    - cd api-server
    - gcloud auth activate-service-account --key-file=$SERVICE_ACCOUNT_KEY
    - gcloud app deploy --project=$GCP_PROJECT_ID --image-url gcr.io/$GCP_PROJECT_ID/$APP_NAME:$CI_COMMIT_SHA
  when: manual
App Engine needs an app.yaml deployment descriptor file, so create it in /app-server with the basics for now:
env: flex
runtime: custom # Use the custom runtime and not nodejs as we build our own docker image.
threadsafe: true

manual_scaling:
  instances: 1
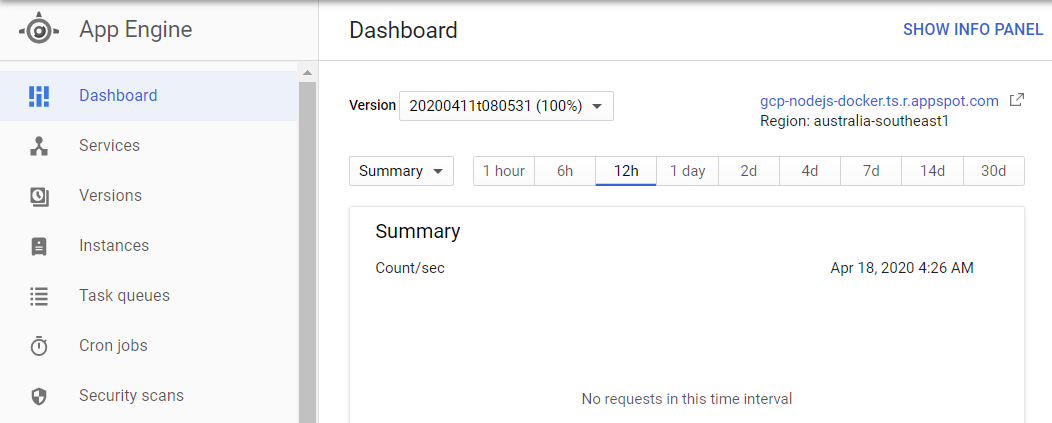
Push the changes and start the manual CI step once the build-docker-image stage has completed. Then you should now see your App Engine service.
Deploying to Kubernetes
The 3rd deployment option with our docker image is to GKE. Just as App Engine needs a deployment descriptor, so does Kubernetes.
Create the file deployment-template.yaml containing:
apiVersion: apps/v1
kind: Deployment
metadata:
    name: api-deployment
spec:
    selector:
        matchLabels:
            app: api-server
    replicas: 1
    template:
        metadata:
            labels:
                app: api-server
                env: production
                app.kubernetes.io/name: api-server
                app.kubernetes.io/instance: api-server-1
                app.kubernetes.io/version: "0.0.1"
                app.kubernetes.io/component: server
                app.kubernetes.io/part-of: api
                app.kubernetes.io/managed-by: gitlab-ci
        spec:
            containers:
                - name: api-server
                  image: gcr.io/gcp-nodejs-docker/api-server:$TAG
                  ports:
                      - containerPort: 8080
                  env:
                      - name: PORT
                        value: "8080"
                      - name: LOG_LEVEL
                        value: "info"
                      - name: NODE_ENV
                        value: "production"
---
apiVersion: v1
kind: Service
metadata:
    name: api-service
spec:
    type: LoadBalancer
    ports:
        - port: 80
          targetPort: 8080
          protocol: TCP
    selector:
        app: api-server
The labels starting with app.kubernetes.io/ come from the recommended labels be applied on every resource object.
This file is just a template to generate the actual deployment.yaml file as we need to replace the $TAG token. Our CI script will use sed to output the deployment.yaml file with the required label.
variables:
  ...
  K8_CLUSTER_NAME: 'cluster-1'
  K8_CLUSTER_ZONE: 'us-central1-c'

stages:
  ...
  - deploy-gke

...

deploy-gke:
  image: google/cloud-sdk:latest
  stage: deploy-gke
  script:
    - cd api-server
    - gcloud auth activate-service-account --key-file=$SERVICE_ACCOUNT_KEY
    - gcloud container clusters get-credentials $K8_CLUSTER_NAME --project=$GCP_PROJECT_ID --zone $K8_CLUSTER_ZONE
    - sed 's/$TAG/'"$CI_COMMIT_SHA"'/g' deployment-template.yaml > deployment.yaml
    - kubectl apply -f deployment.yaml
  when: manual
Create a basic GKE cluster, either in the console or through the command line.
gcloud beta container clusters create cluster-1 \
    --zone us-central1-c \
    --release-channel regular
Next add the Kubernetes Engine Developer role to the gitlab-ci service account, so it has permission to perform the deployment.
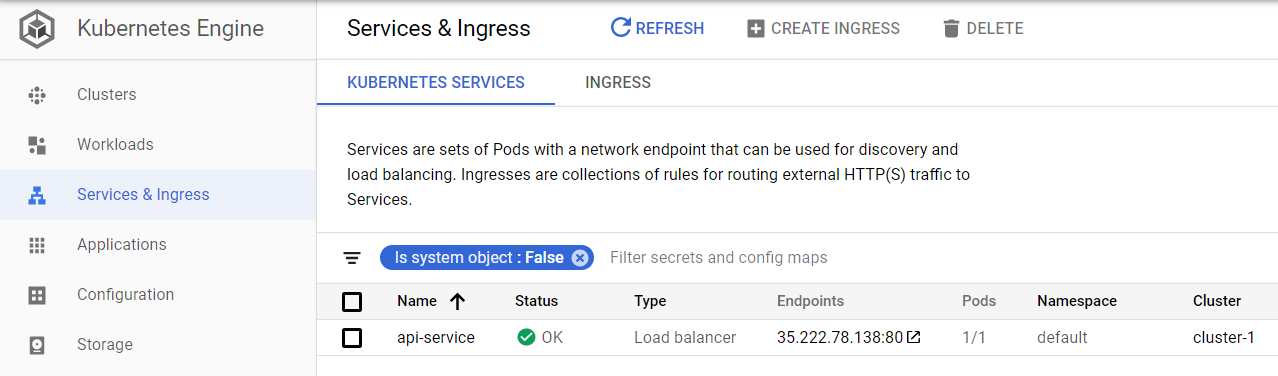
Now we can push the changes and run the manual deploy-gke CI stage. If all went to plan then you should see the service in the console, and the IP address you can access it with.
Deploying to Compute Engine
GCP also has support for deploying containers to compute engine instances. We won’t go into an example of this one, but will leave it up to you to implement and test if you so wish.
https://cloud.google.com/compute/docs/containers/deploying-containers
Wrapping Up
With docker becoming an ubiquitous way to package applications it’s becoming more important for application developers to have some understanding of it’s core concepts. Google Cloud Platform gives us a number of ways to deploy docker images, each with their own pricing model and other considerations. For example at the time of writing managed Cloud Run doesn’t support VPC connections. With this sample code you can continue to build out your own deployment pipeline to suit your requirements.
You can get the source code for this demo app at https://gitlab.com/apporchestra/gcp-nodejs-docker/