The rise of cloud computing combined with infrastructure-as-code (IaC) tooling has given us the ability to rapidly provision complete computing environments for build, test, release and operations that follow DevOps best practices. Over this series of articles we’ll build a simple cloud native environment and application that follows many of the best practices. The sample project won’t be perfect for every use case as every solution has its trade-offs, but it will give you a solid idea of what can be done to automate your infrastructure provisioning and application deployment pipeline.
Pulumi is an infrastructure-as-code tool that leverages Terraform, and allows the use of general programming languages to define the infrastructure state using standard data structures and control flow (if/for etc), instead of the custom HCL syntax. Pulumi currently provides SDK’s in .NET Core (C#, VB, F#), Go, Node.js (JavaScript, TypeScript) and Python.
As our starter project uses TypeScript for the front-end and back-end, its nice to have the consistency of the same language to define our infrastructure as well.
When we think of infrastructure-as-code tools we might just be thinking of provisioning hyperscale cloud infrastructure such as load balancers, networking, compute instances etc. Terraform and Pulumi also support the smaller clouds such as DigitalOcean and Linode, and even supports configuring other types of services such as Cloudflare, Mailgun and GitLab. You can see the full list Pulumi supports here.
So before we even start building our cloud IaC we can begin by defining our GitLab repositories and settings such as protected branches variables. The secure configuration of GitLab projects is of equal importance to configuring the cloud infrastructure securely, with its handling of the keys to the kingdom, all the source code and credentials to build and deploy applications, and to run Pulumi for provisioning cloud infrastructure. Using IaC makes is easier to have consistent configurations across projects, as well as the usual IaC benefits such as an audit history, rolling back changes and easily re-creating environments.
Getting Started with Pulumi
Now don’t go creating a project in GitLab just yet, we’re going to do it all from code!
You can fork and clone the code for this project at https://gitlab.com/lattice-group/lattice-org so look at the final result or jump straight into getting started with it.
You’ll need to setup your dev environment by ensuring you have Pulumi and the Google Cloud SDK installed (https://www.pulumi.com/docs/get-started/gcp/install-pulumi/) and authenticate with both the pulumi and gcloud command line tools.
Create a folder that will be the project root, then inside that create a folder named gitlab. This will contain our Pulumi project to provision and configure the GitLab repositories. Pulumi has the concepts of projects and stacks, where the stack is a variation on the project deployment (e.g. dev, qa, production) There wasn’t a stater project from the pulumi command line tool for a GitLab project so we’ll need to create the basic project setup ourselves.
As a note we won’t call the pulumi project gitlab because of this isue. That will save you an hour of frustration!
Our initial files will be:
package.json
{
    "name": "gitlab-typescript",
    "dependencies": {
        "@pulumi/pulumi": "^1.0.0",
        "@pulumi/gitlab": "^1.0.0"
    },
    "devDependencies": {
        "@types/node": "^12.0.0"
    }
}
index.ts
import * as pulumi from "@pulumi/pulumi";
import * as gitlab from "@pulumi/gitlab";
Pulumi.yaml
name: gitlab-com
runtime: nodejs
description: Creates the GitLab.com configuration
Run npm install and then pulumi preview to initialise the stack, and give it the name prod.
Creating GitLab projects with Pulumi
Lets start building our GitLab configuration adding to index.ts (update the group and project name to suit you)
import {Group, Project} from "@pulumi/gitlab"

const config = new pulumi.Config()

// Visibility level of the group and projects. You will probably want to make it private for your own projects
const visibilityLevel = 'public'

// Create the group that the project(s) will belong under
const group = new Group('Lattice parent group', {name: 'Lattice Group', path: 'lattice-group', visibilityLevel} /*, {import: ''}*/)
export const gitlabGroupId = group.id.apply(id => +id) // Need to convert the groupId to a number https://github.com/pulumi/pulumi-gitlab/issues/28

// Create the projects
const tags =  ['pulumi', 'gitlab', 'gcp', 'google cloud', 'typescript']
const defaultBranch = 'master'
const requestAccessEnabled = false

const infraProject = new Project('Project-infra', {name: 'Lattice Infrastructure', path: 'infra', namespaceId: gitlabGroupId, requestAccessEnabled, visibilityLevel, defaultBranch, tags, sharedRunnersEnabled} /*, {import: ''}*/)
const appProject = new Project('Project-app', {name: 'Lattice App', path: 'app', namespaceId: gitlabGroupId, requestAccessEnabled, visibilityLevel, defaultBranch, tags} /*, {import: ''}*/)
This declares the group and project definitions and Pulumi takes care of ensure they exist with desired properties.
Because of the asynchronous nature of provisioning the resources we use the .apply() method to create the groupId of the appropriate type instead of doing the conversion directly.
To bootstrap the GitLab project we will need to set the configuration key for the Pulumi GitLab provider so it can call the GitLab API.
Generate a GitLab token key from https://gitlab.com/profile/personal_access_tokens named pulumi with the api scope then run
pulumi config set gitlab:token <value> --secret
The –secret arg encrypts the value with a Pulumi project specific key. The command line is clever enough to identify config values that look like credentials and prompts to use the –secret arg. Also this is why we don’t call our project gitlab as it conflicts with the gitlab:token configuration.) You will need to keep this token value temporarily for a later step.
Now run pulumi preview and double check what its planning to create.
Finally run pulumi up -y. If there’s any errors, the most likely one is error: POST https://gitlab.com/api/v4/groups: 400 {message: Failed to save group {:path=>["has already been taken"]} then you will need to adjust your script accordingly and try again.
Browse to https://gitlab.com and verify the group and projects have been created.
Now we can initialise our folder as the Git repository by running
git init
git remote add origin https://gitlab.com/lattice-group/lattice-org.git
Then add the files, commit and push.
Creating the GitOps build config for GitLab CI
We are going to use GitOps for our infrastructure code, which means commits/merges to certain branches will trigger the deployment pipeline. For security/compliance/process reasons we don’t want to allow anyone to commit to these branches, so what would like to do next is update the GitLab infra project to set the Git branches matching production/* as protected.
To declare the protected branch add this to index.ts:
// Protect the infrastructure deploy branches, only allow maintainers to merge and push
new gitlab.BranchProtection('Infra-protect-production-branches', {
    branch: 'production/*',
    mergeAccessLevel: "maintainer",
    project: infraProject.id,
    pushAccessLevel: "maintainer",
})
This time we won’t run pulumi locally but instead use GitLab CI service to run Pulumi to update the project configuration. We will need create the configuration for our build pipeline. If you’re not familiar with GitLab CI then take a look through the docs.
The two CI config files to create are /.gitlab-ci.yaml
image: apporchestra/pulumi-gcp-gcloud

stages:
  - infra-preview
  - infra-deploy

include:
  - '/gitlab/.gitlab-ci.yml'
and /gitlab/.gitlab-ci.yml
gitlab-preview:
  stage: infra-preview
  only:
    - production/gitlab
  script:
    - cd gitlab
    - pulumi stack select prod
    - pulumi config set gitlab:token $GITLAB_TOKEN --secret
    - npm install
    - pulumi preview --stack prod --suppress-outputs --show-replacement-steps

gitlab-deploy:
  stage: infra-deploy
  only:
    - production/gitlab
  when: manual
  script:
    - cd gitlab
    - pulumi stack select prod
    - pulumi config set gitlab:token $GITLAB_TOKEN --secret
    - npm install
    - pulumi up --stack prod --skip-preview
These build steps will only run when there are commits to the branch named production/gitlab so we can commit and push the changes to master now and the build won’t run.
The configuration defines a two stage build, where the second deploy stage requires it to be manually started, with the intent that the preview output from the first stage is reviewed first.
You may have noticed we configure a custom docker image apporchestra/pulumi-gcp-gcloud for the build runner. This image contains everything we need to run the build script - Node.js, Google Cloud SDK and Pulumi.
For the Pulumi CLI to work in the CI environment it needs the PULUMI_ACCESS_TOKEN environment variable set so it can authenticate to the Pulumi service to get/update the stack state and get the configuration variables. Create a Pulumi access token from https://app.pulumi.com/{username}/settings/tokens and keep a copy of it. We will need to set this as a GitLab project CI/CD variable, which you can see on under Settings -> CI/CD. Also the build will need a $GITLAB_TOKEN environment variable set.
We will have to bootstrap these in ourselves in one of two ways. The first option is to set the two tokens as secret pulumi configuration values and reference the config values in the code. In this case we would need add to index.ts:
// Set the Pulumi and GitLab tokens into protected variable so the GitLab CI builds can use Pulumi
const infraPulumiTokenVariable = new gitlab.ProjectVariable("Infra-variable-pulumi-token", {
    key: "PULUMI_ACCESS_TOKEN",
    project: infraProject.id,
    protected: true,
    value: config.requireSecret<string>('pulumi-token'),
    environmentScope: '*' // Need to specify this otherwise defaults to 0 which doesn't match all environments
})

const infraGitlabTokenVariable = new gitlab.ProjectVariable("Infra-variable-gitlab-token", {
    key: "GITLAB_TOKEN",
    project: infraProject.id,
    protected: true,
    value: config.requireSecret<string>('gitlab-token'),
    environmentScope: '*' // Need to specify this otherwise defaults to 0 which doesn't match all environments
})
And then run:
pulumi config set pulumi-token <pulumi-token-value>
pulumi config set gitlab-token <gitlab-token-value>
pulumi up
The second option if we don’t wont to commit the encrypted values to version control is to manually create them on GitLab.com and then we can get a reference them. Initially the variables will need to be not protected, then after we protect the production branches we can set the variables to protected.
const infraPulumiTokenVariable = gitlab.ProjectVariable.get("Infra-variable-pulumi-token", pulumi.interpolate `${infraProject.id}:PULUMI_ACCESS_TOKEN`)
const infraGitlabTokenVariable = gitlab.ProjectVariable.get("Infra-variable-gitlab-token", pulumi.interpolate `${infraProject.id}:GITLAB_TOKEN`)
Note how we use the pulumi.interpolate function to generate the id based on the project id. You can read more about the Pulumi programming model here.
Lets push this to the production deploy branch by running:
git branch production/gitlab
git push origin production/gitlab
You’ll notice that the CI build doesn’t kick off as we need to enable the shared CI runners.
Instead of updating it manually in GitLab.com lets do it by code. Change back to the master branch and update the project definitions to include the option arg sharedRunnersEnabled: true. Run pulumi up locally and commit the changes to master.
Configuring branch protection
Now we’ll add the protected branch configuration to the infrastructure project. To index.ts add
// Protect the infrastructure deploy branches, only allow maintainers to merge and push
new gitlab.BranchProtection('Infra-protect-production-branches', {
    branch: 'production/*',
    mergeAccessLevel: "maintainer",
    project: infraProject.id,
    pushAccessLevel: "maintainer",
})
Commit this to the master branch then merge to production/gitlab and push to origin.
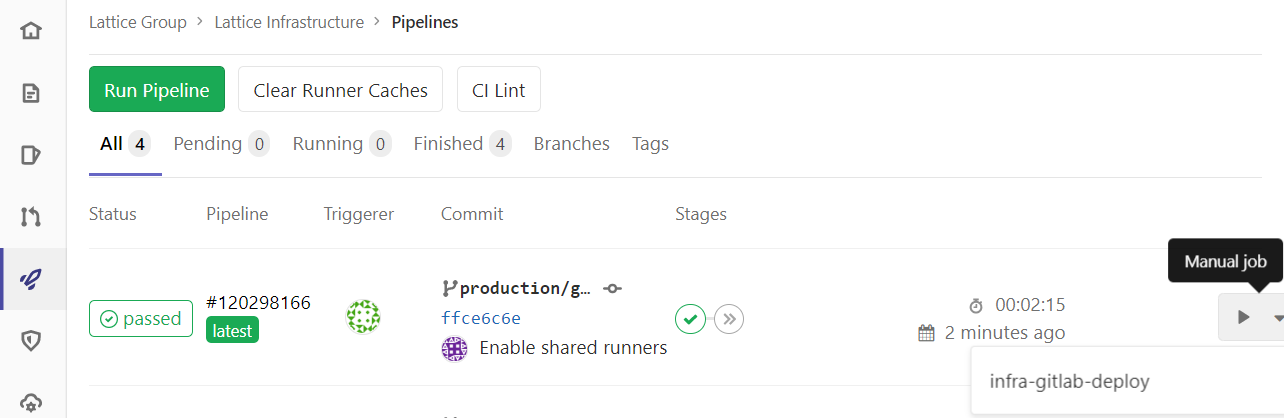
In your GitLab CI page you should see the build pipeline running and eventually the first stage should have passed.
If you click into the infra-preview stage you can see the output of the pulumi preview command
 $ pulumi preview --stack prod --suppress-outputs --show-replacement-steps
 Previewing update (prod):
     pulumi:pulumi:Stack gitlab-com-prod running
     gitlab:index:Group Lattice parent group
     gitlab:index:Project Project-infra
     gitlab:index:Project Project-app
     pulumi:pulumi:Stack gitlab-com-prod running read gitlab:index:ProjectVariable Infra-variable-pulumi-token
     pulumi:pulumi:Stack gitlab-com-prod running read gitlab:index:ProjectVariable Infra-variable-gitlab-token
  +  gitlab:index:BranchProtection Infra-protect-production-branches create
     pulumi:pulumi:Stack gitlab-com-prod running read gitlab:index:ProjectVariable Infra-variable-pulumi-token
     pulumi:pulumi:Stack gitlab-com-prod running read gitlab:index:ProjectVariable Infra-variable-gitlab-token
     pulumi:pulumi:Stack gitlab-com-prod

 Resources:
     + 1 to create
     4 unchanged
If you’re happy with the preview plan then trigger the manual infra-gitlab-deploy stage.
In the CI build output you should see something like
 $ pulumi up --stack prod --skip-preview --suppress-outputs
 Updating (prod):
     pulumi:pulumi:Stack gitlab-com-prod running
     gitlab:index:Group Lattice parent group
     gitlab:index:Project Project-infra
     gitlab:index:Project Project-app
     pulumi:pulumi:Stack gitlab-com-prod running read gitlab:index:ProjectVariable Infra-variable-pulumi-token
     pulumi:pulumi:Stack gitlab-com-prod running read gitlab:index:ProjectVariable Infra-variable-gitlab-token
  +  gitlab:index:BranchProtection Infra-protect-production-branches creating
     pulumi:pulumi:Stack gitlab-com-prod running read gitlab:index:ProjectVariable Infra-variable-pulumi-token
     pulumi:pulumi:Stack gitlab-com-prod running read gitlab:index:ProjectVariable Infra-variable-gitlab-token
  +  gitlab:index:BranchProtection Infra-protect-production-branches created
     pulumi:pulumi:Stack gitlab-com-prod

 Resources:
     + 1 created
     4 unchanged
 Duration: 5s
 Permalink: https://app.pulumi.com/apporchestra/gitlab-com/prod/updates/4
That’s enough to get you started with configuring with code more features of GitLab such as merge approvals, push rules etc. As you build your desired GitLab configuration for a project you’ll be able to easily re-use it to configure new projects in the exact same way.
We’ll finish with an example of how we could use the full power of TypeScript with type declarations and loops to declare the members of the project, if we wanted to manage membership this way.
// This is how you could manage a small number of members in a project
type Level = 'guest' | 'reporter' | 'developer' | 'maintainer' | 'master'
type Member = {id: number, level: Level}

const appMembers: Member[] = [
    // {id: 123245, level: 'maintainer'} // Requires the numeric user id, it could be possible to provide emails and search by them but thats a project for later
]

appMembers.forEach(member => {
    new gitlab.ProjectMembership(`Infra-member-${member.id}`, {
        accessLevel: member.level,
        projectId: project.id,
        userId: member.id,
    });
})
Next up - configuring our Google Cloud organisational infrastructure.